Kodi has a TV button. You press it, full of hope, and Kodi tells you: “You did not set up PVR yet.” Thanks, Kodi. Very helpful.
Here is the good news. That button can give you proper live TV straight from the aerial on your roof, with a TV guide, pause, rewind and recording. All of it legal, all of it official, no dodgy anything. Welcome to Kodi Kitchen: today we bake live TV from three ingredients, and I will tell you exactly which shop sells each one.
Why Kodi’s TV section is empty
Kodi has no TV tuner inside it. None. It is a very good waiter with no kitchen. The Kodi wiki lists the three things you need:
- A tuner, which plugs into your aerial cable.
- A backend, a small server that does the tuning (and, with the right one, the recording).
- A PVR client, an official Kodi add-on that connects Kodi to that backend.
PVR stands for personal video recorder. The best part: one backend serves the whole house, and every Kodi device that wants live TV just gets the client add-on.
Ingredient 1: a tuner that speaks Freeview
You have three choices: a card inside a computer, a USB tuner stick, or a network tuner that plugs into your router. Freeview HD in the UK uses DVB-T2, so whatever you buy must support it.
This is where people get caught out with HDHomeRun. SiliconDust’s own page names the HDHomeRun FLEX QUATRO (HDFX-4DT) as its current model for the UK, Europe, Australia and New Zealand, with DVB-T and DVB-T2 including Freeview HD. The same page says the HDFX-2US, HDFX-4US and HDFX-4K are made for the American ATSC standard and will not work in the UK. If you find an older unit, the rule of thumb is the letters at the end: the CONNECT DUO and CONNECT QUATRO DVB versions (HDHR5-2DT and HDHR5-4DT) also do DVB-T and DVB-T2, and SiliconDust’s shop sells them refurbished for the UK. Anything ending in US or 4K is the wrong plug for the wrong country.
Two more things before you spend money. The Kodi wiki advises against running network tuners over Wi-Fi, and an HDHomeRun connects by Ethernet anyway, so plan for a cable to your router. And in the UK you still need a TV Licence to watch or record programmes as they are broadcast, exactly like your normal telly. Kodi does not change that.
Ingredient 2: pick your backend
This is the choice that decides whether you get a recorder. The Kodi wiki also notes that no backend runs on Android, iOS or tvOS, so on those devices you only install the client and point it at a backend elsewhere on your network.
| Recipe | What you get in Kodi | Records in Kodi? |
|---|---|---|
| A: HDHomeRun with the HDHomeRun Client | Live TV and the TV guide | No |
| B: Tvheadend (any supported tuner, including an HDHomeRun) with the Tvheadend HTSP Client | Live TV, guide, recordings, timers, pause and rewind | Yes |
Recipe A: the HDHomeRun Client
The quick one. The HDHomeRun sits on your network and Kodi’s official HDHomeRun Client finds it for you. Before you touch Kodi, set the tuner up and scan your channels in SiliconDust’s own HDHomeRun app, because the Kodi wiki’s advice is to get live TV working in the backend first.
In the add-on settings you get a short list of switches: hide protected channels, enable debug logging, hide duplicate channels, mark new show and use HTTP discovery. For most homes the defaults are fine.
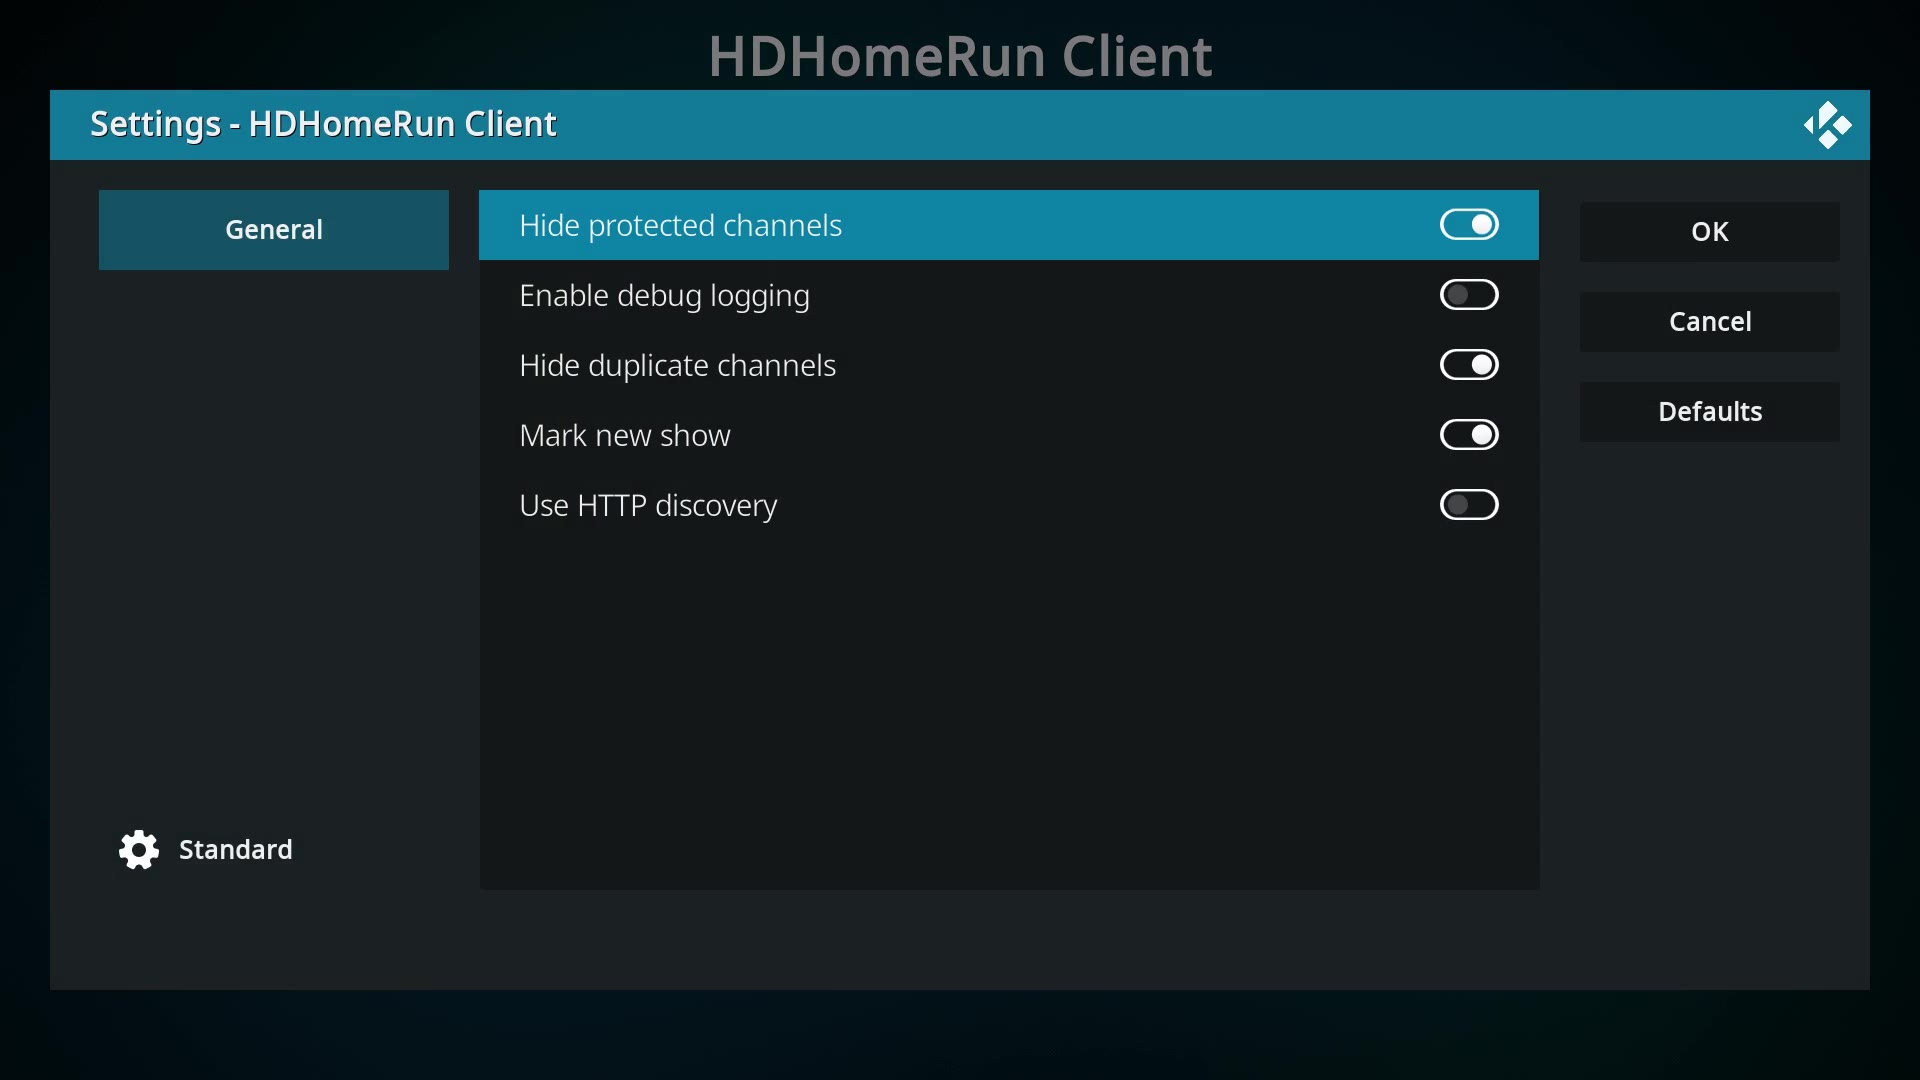
Now the catch. The client is live TV and guide only. I checked the official source code on the Kodi PVR GitHub, for both the Omega (Kodi 21) and Piers (Kodi 22) branches: recordings and timers are switched off in the client. SiliconDust’s own app can record to a USB drive plugged into the HDHomeRun, but that DVR lives in SiliconDust’s app, not in Kodi’s Recordings menu. Want Kodi itself to be the recorder? That is Recipe B.
Recipe B: the Tvheadend server
The chef’s special. Tvheadend is an open source TV streaming server and video recorder for Linux, and the Kodi wiki lists it for Linux, macOS and the Raspberry Pi. Its documentation covers internal cards, USB tuners and network tuners, and the project’s own page lists HDHomeRun among its supported inputs. So you can keep that HDHomeRun and still get recordings.
On LibreELEC it is one install away rather than a separate project: Add-ons > Install from repository > LibreELEC Add-ons > Services > Tvheadend Server. On Debian or Ubuntu it comes as a normal package.
You set Tvheadend up in a web browser on port 9981 (for example 192.168.1.20:9981, using your server’s address). The setup wizard walks you through access control, your tuner and network, the predefined muxes for DVB-T2 and your local transmitter, the scan, and mapping services to channels. Make sure you can watch a channel in Tvheadend before you connect Kodi. Taste the sauce before you serve it.
Installing the PVR client
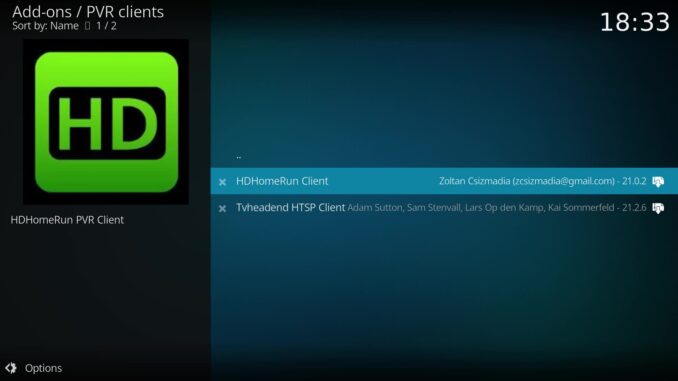
On Android, Windows and macOS go to Settings > Add-ons > Install from repository > PVR clients, pick HDHomeRun Client or Tvheadend HTSP Client and press Install. Both come from the official Kodi Add-on repository.
Linux is different, and my test machine runs Linux, so I hit this myself. The PVR clients come as system packages, such as kodi-pvr-hts and kodi-pvr-hdhomerun, so the PVR clients category does not even appear in the repository until you install them. On LibreELEC, CoreELEC and OSMC the PVR add-ons are already bundled. Either way you end up in Add-ons > My add-ons > PVR clients, where both sit waiting for their big moment.
Configure and enable the Tvheadend client
Open the Tvheadend HTSP Client, choose Configure and fill in the connection settings:
- Name: anything you like. Mine is “Living room TV server”, because I am very creative.
- Tvheadend hostname or IP address: the machine running Tvheadend. Mine runs on the same box, so 127.0.0.1. Yours is probably something like 192.168.1.20.
- HTTP port 9981 and HTSP port 9982: leave the defaults unless you changed them in Tvheadend.
- Username and password: only if you set them up in Tvheadend.
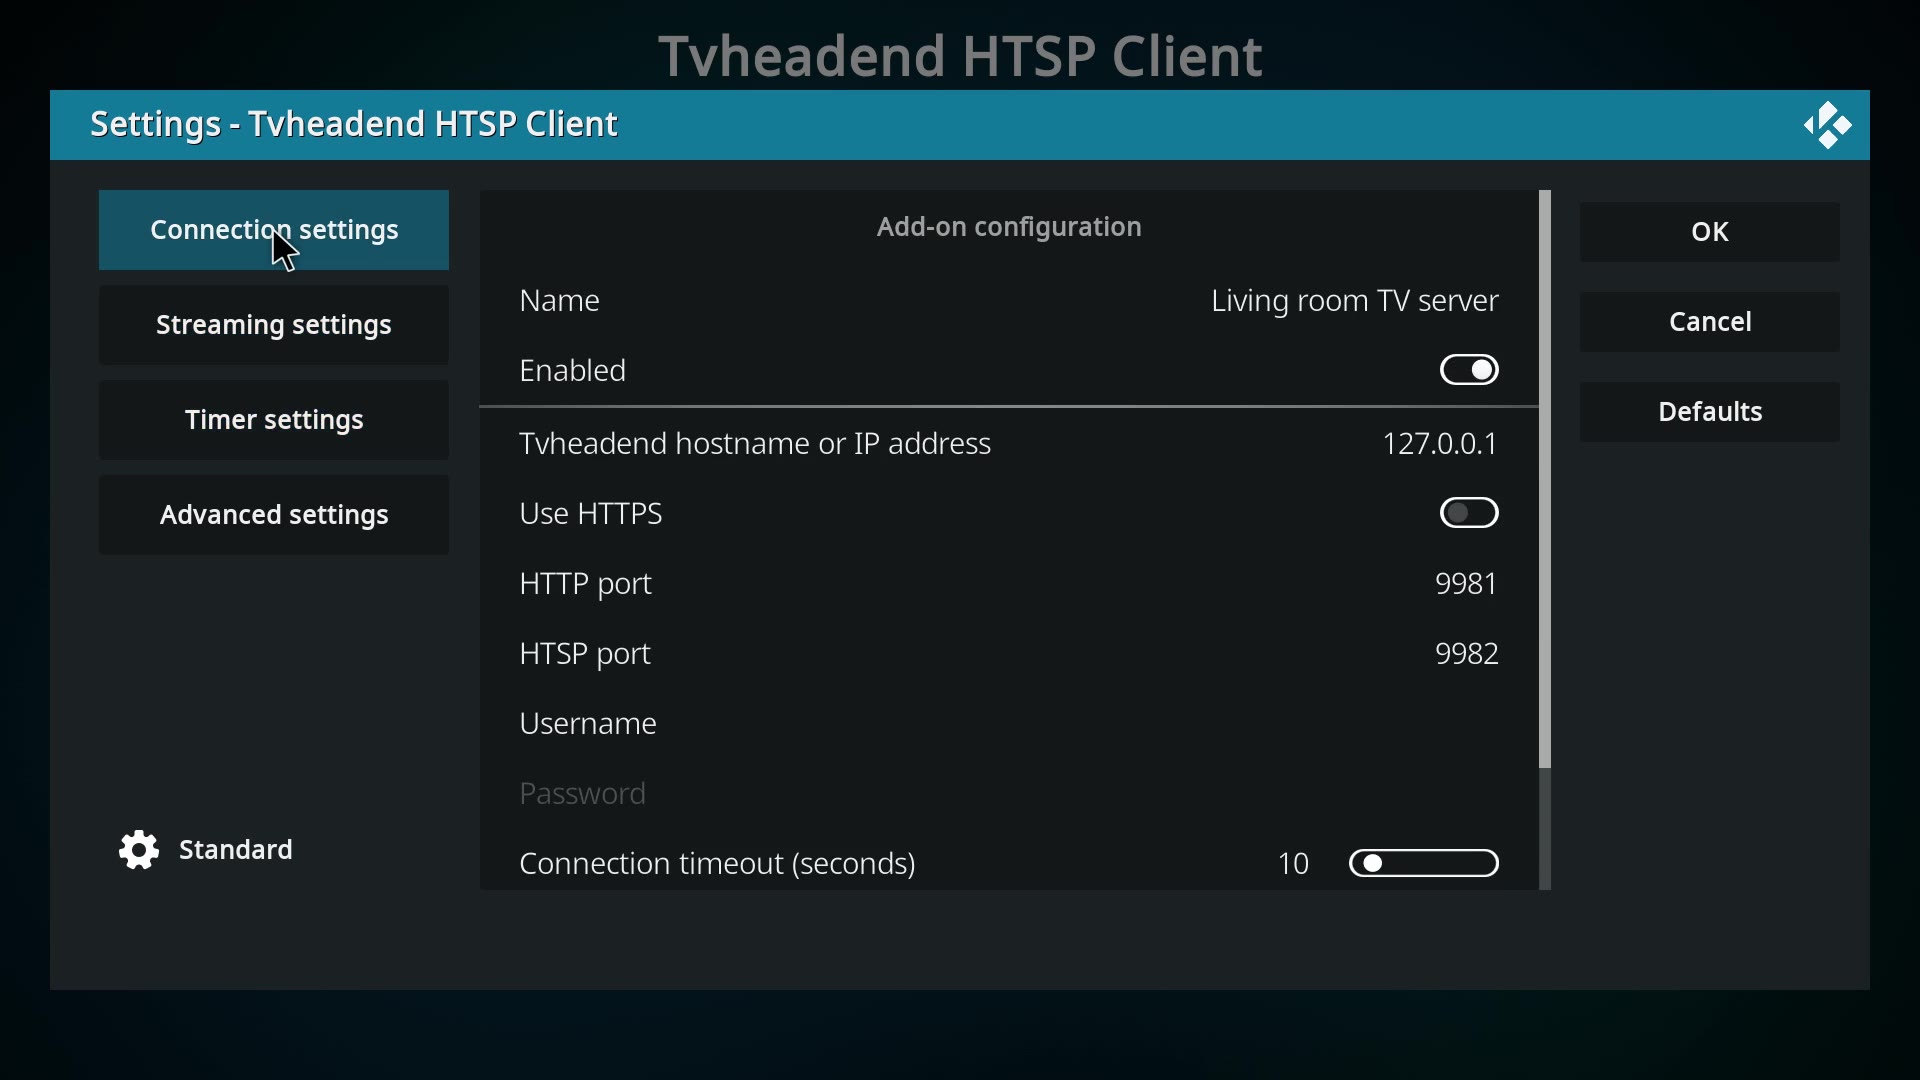
The Timer settings tab handles things like duplicate episodes, and the defaults are fine. Press OK, then Enable, and restart Kodi as the wiki recommends after changing PVR settings. The waiter has finally found the kitchen.
TV, Guide and recording
Back on the home screen, TV now shows Guide, Channels, Recordings and Timers instead of a telling off. My lists are empty because the test machine has no aerial plugged in (it is a very sad little box), but yours fills up as soon as the backend has scanned your Freeview channels. If the guide ever gets out of step, Settings > PVR & Live TV > Guide > Clear data wipes Kodi’s copy and pulls it fresh from the backend.
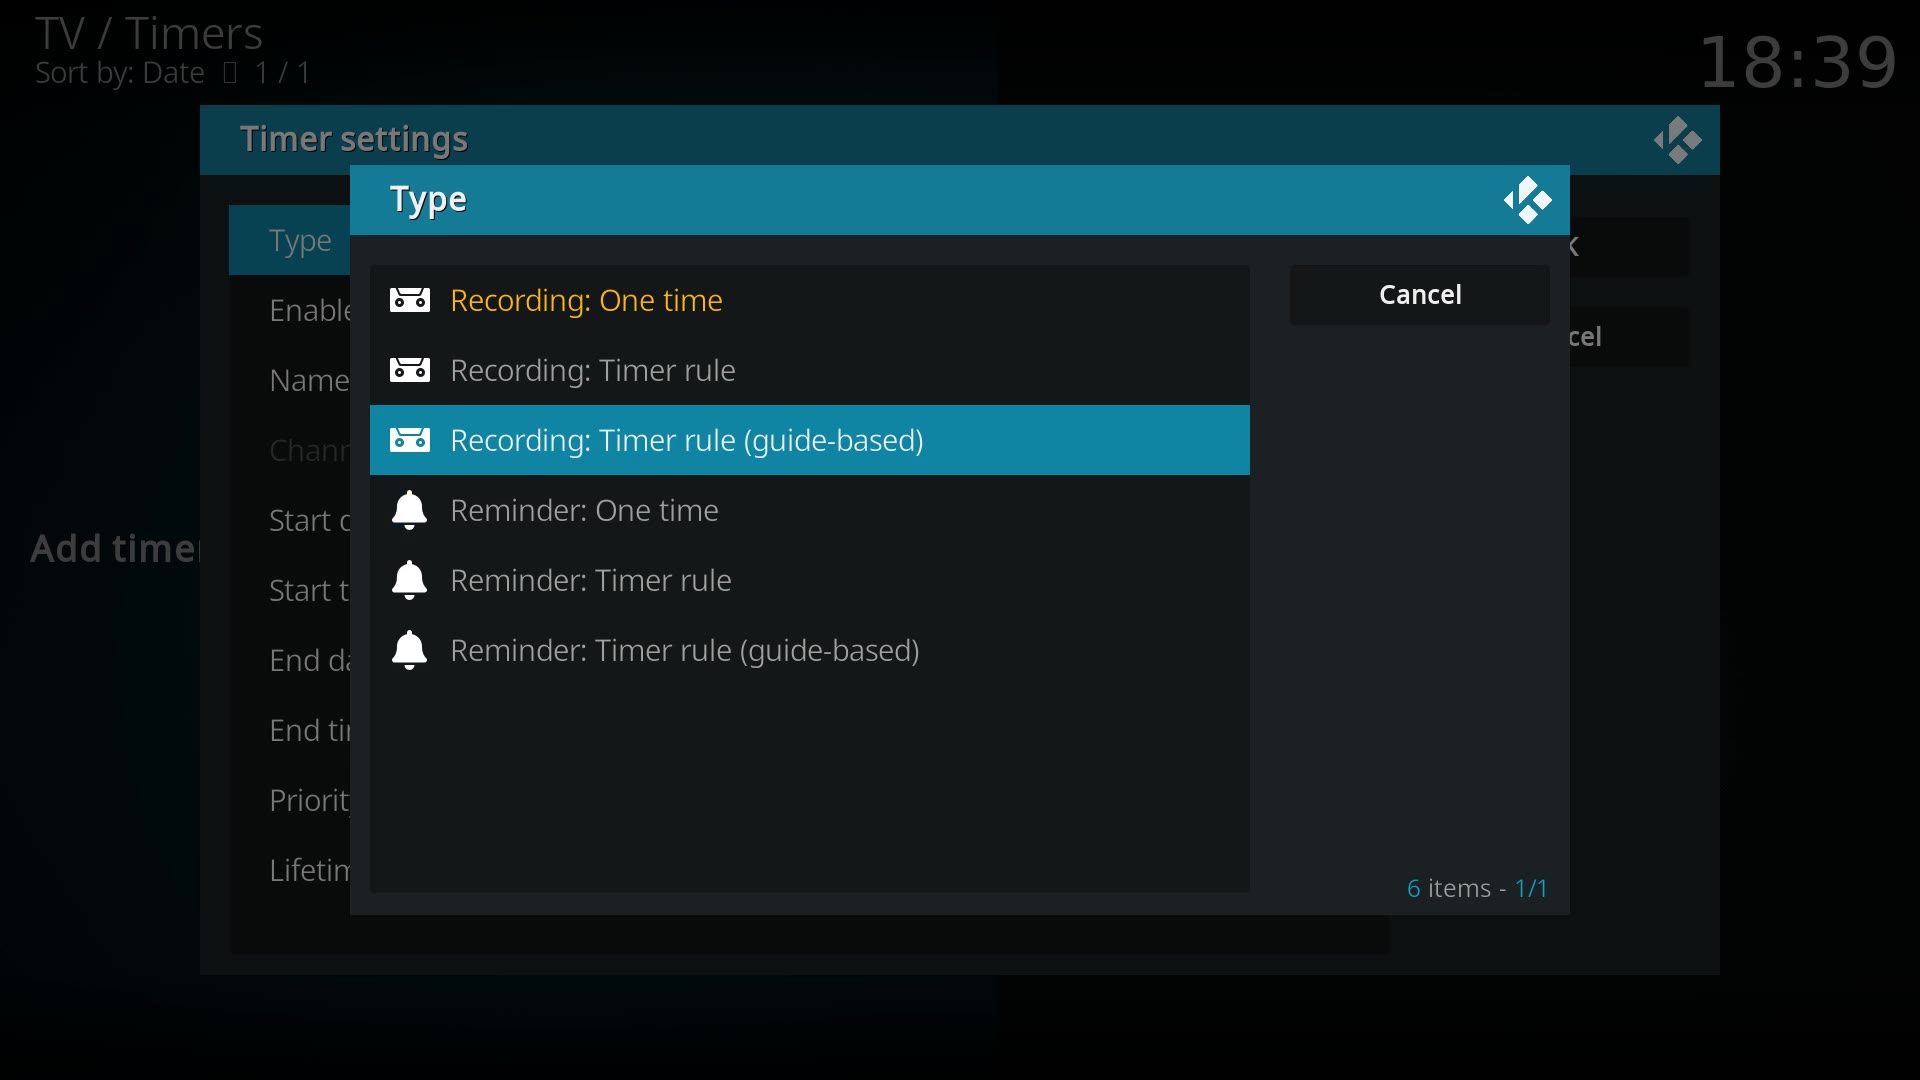
With Tvheadend, recording is the dessert. Pick a programme in the guide and choose Record, or press record while watching and Kodi follows the Instant recording action in Settings > PVR & Live TV > Recording. In Timers > Add timer you choose the type:
- Recording: One time records a single slot.
- Recording: Timer rule repeats on a schedule.
- Recording: Timer rule (guide-based) follows a programme through the guide, which is how you record a whole series automatically.
Recordings are stored by the backend, not by your Kodi box, so you can record in the living room and watch in the bedroom on any Kodi in the house. Tvheadend can also pause and rewind live TV. Go and put the kettle on. The telly will wait.
What about Kodi 22 Piers?
The first Kodi 22 release candidate arrived on 10 October 2026, the PVR menus work the same way, and Team Kodi’s post lists a fix for guide timestamps so they stay valid beyond 2038. Finally, I can plan my telly for 2039. If you are moving up, read the Kodi 21 to 22 pre-flight checklist first, and back up Kodi properly before you touch anything.
The recipe card
- Aerial into a DVB-T2 tuner (for HDHomeRun in the UK: the FLEX QUATRO HDFX-4DT, or an older model ending in DT).
- Choose your backend: HDHomeRun on its own for live TV and guide, or Tvheadend if you want Kodi to record.
- Get live TV working in the backend first.
- Install the official PVR client from Kodi’s repository (or your Linux packages).
- Configure it, enable it, restart Kodi.
- Guide, pick a programme, Record.
Sources: Kodi wiki: PVR, Kodi wiki: PVR/Backends, Kodi wiki: Tuner cards, Kodi wiki: Tvheadend HTSP Client, Kodi wiki: HDHomeRun Client, kodi-pvr/pvr.hdhomerun source, SiliconDust: HDHomeRun DVB, Tvheadend docs: Tuners, Tvheadend project page, kodi.tv: Kodi 22 Piers RC 1. Checked 17 October 2026 on official Kodi 21.2 with the official PVR clients on my test machine.
Best IPTV boxes to buy
These are media boxes and sticks that can run players and licensed apps. The first six are Google certified Android TV or Google TV devices with Google Play. The three Fire TV Sticks run Amazon’s own systems with the Appstore instead of Google Play: the 4K Max and 4K Plus run Fire OS, which is Android based, while the new Fire TV Stick 4K (2026) runs Vega OS, which does not allow sideloading Android apps, only Appstore apps. The last one, the Formuler, runs its own Android and is not certified. They are not pirate hardware. They do not come with channels or playlists. I am not claiming I personally lab-tested every SKU this month.
Pick a Google TV box when you want Play Store apps on a proper TV OS or a dedicated player behind the sofa. Pick a Fire TV Stick when Prime Video and the Appstore already cover what you watch. If you need an Android player from outside the Appstore, skip the Vega OS stick.
- NVIDIA SHIELD TV Pro: the premium pick, a certified Android TV player with AI upscaling, Dolby Vision/Atmos and Gigabit Ethernet for the main living-room telly. Amazon UK | Amazon US | Amazon DE | Amazon FR | Amazon IT
- Google TV Streamer 4K: solid Google TV living-room default with Ethernet, 32GB storage and Dolby Vision/Atmos. Amazon UK | Amazon US | Amazon DE | Amazon FR | Amazon IT
- Xiaomi TV Box S (3rd Gen): Google TV box with 32GB storage, Wi-Fi 6 and Dolby Vision/Atmos, the cheaper box route than the Streamer. Amazon UK | Amazon US | Amazon DE | Amazon FR | Amazon IT
- Xiaomi TV Stick 4K (2nd Gen): budget Google TV stick with Wi-Fi 6 and Dolby Vision/Atmos when you want HDMI-simple, not a full box. Amazon UK | Amazon US | Amazon DE | Amazon FR | Amazon IT
- Budget Google TV 4K player: a cheaper certified Google TV player for a second telly. The model differs by store, so each link names the one you get there. MECOOL KD3 (Amazon UK) | onn. Google TV 4K Streaming Box (Amazon US) | Strong LEAP-NOVA-X (Amazon DE) | Strong LEAP-NOVA-X (Amazon FR) | Strong LEAP-NOVA-X (Amazon IT)
- MECOOL MEon1: Google TV certified 4K box with AI upscaling and 32GB storage for a dedicated player behind the sofa. Amazon UK
- Fire TV Stick 4K Max: the most powerful Fire TV Stick, with Wi-Fi 6E, Dolby Vision/Atmos and 16GB storage. It runs Fire OS, which is Android based, so you get Appstore apps and can still sideload an Android player. Amazon UK | Amazon US | Amazon DE
- Fire TV Stick 4K Plus: the older Fire OS stick with Wi-Fi 6 and Dolby Vision/Atmos. It is being phased out, so buy it only while stock lasts. Like the Max, it can still sideload Android apps. Amazon UK | Amazon US | Amazon DE | Amazon FR | Amazon IT
- Fire TV Stick 4K (2026): the newest and slimmest 4K stick, with a new remote. It runs Vega OS, which does not allow sideloading Android apps, only Appstore apps, so check your player is in the Appstore before you buy. Amazon UK | Amazon US | Amazon DE | Amazon FR | Amazon IT
- Formuler Z12 Ultra SE: the newest Formuler box, built around MYTVOnline 4 for IPTV playlists. It runs Formuler’s own Android rather than certified Google TV, so there is no Netflix in HD and no Google certification. Formuler Z12 Ultra SE (Amazon UK) | Formuler Z12 Ultra SE (Amazon US) | Formuler Z12 Ultra SE (Amazon DE) | Formuler Z12 Ultra SE (Amazon FR) | Formuler Z12 Ultra SE (Amazon IT)
Whichever you pick, check that the app you need is in its store before you pay. And none of these boxes or sticks magically make unlicensed streams legal.
Written by Dr Husham Memar