In this guide, we will learn how to install Uranus Kodi addon. Uranus is one of the newer addons and it lets you stream movies, shows, and other video content. This plugin has an impressive collection from multiple streaming sources. I have been using it for some time and will not hesitate in saying that I often find it better than Covenant or other popular addons.
My reasons are simple! Uranus addon for Kodi gives me fewer streaming sources, but it clearly prefers quality over quantity. Most of its streaming links work for the most part. I don’t have to sift through the endless list of sources, hit and try a bunch of times to find the link that would finally start streaming. The other thing I love about Uranus is that it has more HD streams than others without a supplementary plugin like Real Debrid.
All in all, I am fairly impressed with Uranus addon on Kodi. I enjoy it, and I would like you to enjoy it too. Keep reading!
How to Install Uranus on Kodi 17.6
I am now going to tell you how to install Uranus on Kodi 17.6, the Krypton version. Most Kodi users have migrated to Krypton. But, if you still use Jarvis, I have the installation process outlined for this version as well. That’s later though. First, with the latest Kodi version.
Also, the method below is for Kodi on Windows 10. What I really like about Kodi is that its interface is largely the same across all platforms including smartphones, tablets, and Amazon Fire TV Stick. Therefore, the following process will work just as good on any device you may be using.
Let’s get started.
Part 1: Prepare Kodi to Install Uranus Addon
There is a security setting in Kodi that would not let you install any add-on you are sourcing from outside official Kodi Addon Repository. Uranus is also a third-party add-on, which we will install from an external repository. Therefore, we will need to change the security setting and enable the ‘Unknown Sources’.
If this gets you concerned about the safety of your device, have no worries at all. While it is true that there are some potentially unsafe addons, the one we are going to install is clean. I have tried it personally.
Here, is how you allow third-party add-on installation.
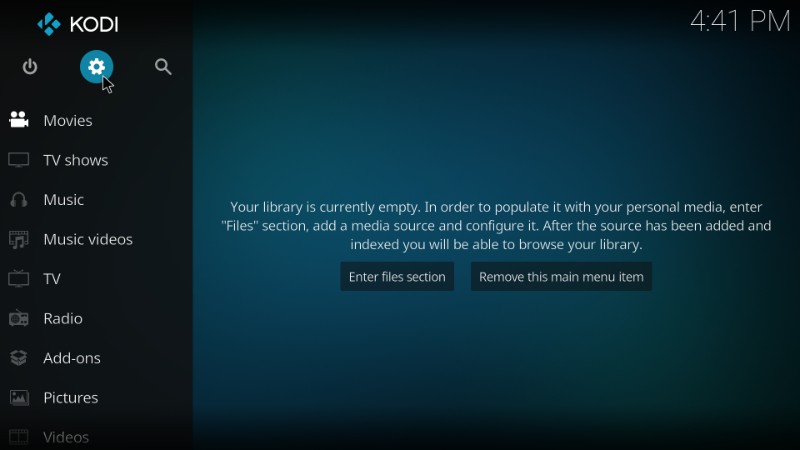
#1. Open ‘Settings’ menu from the Kodi home screen. You will find this option on the top left and looks like a gear or cog icon.
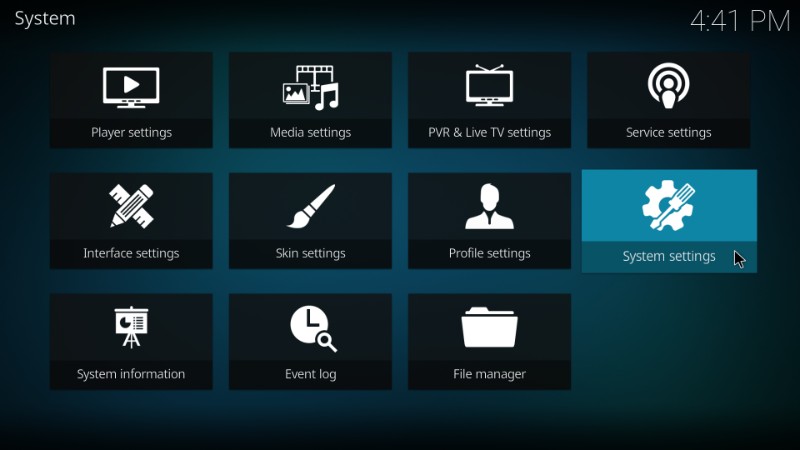
#2. Now, select and open ‘System Settings’ from the list of the options in the Settings menu
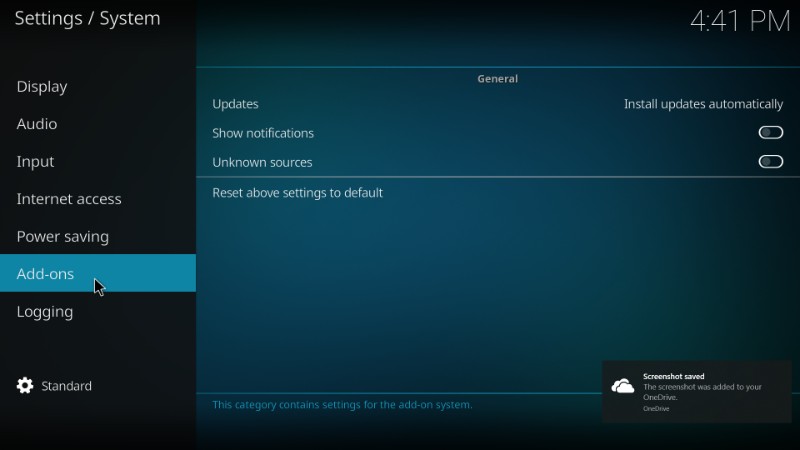
#3. Click Add-ons setting on the left sidebar (as shown in the image below)
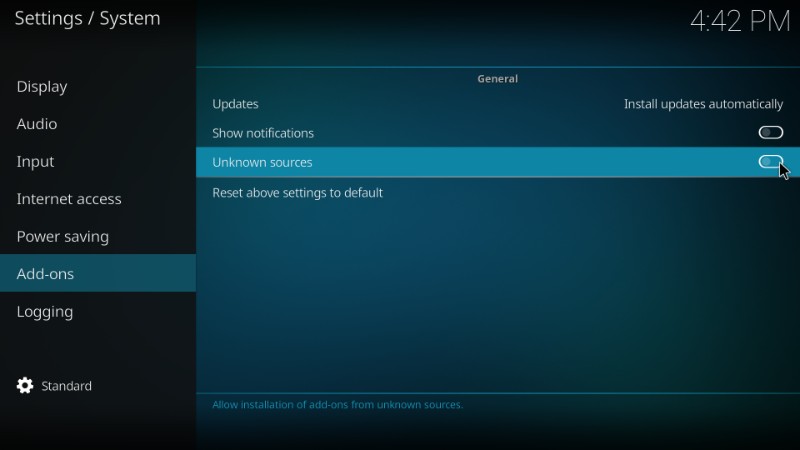
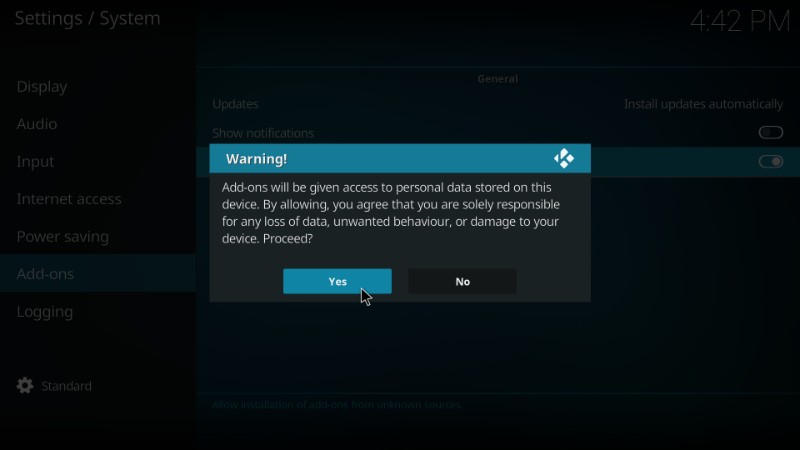
#4. Switch on the Unknown Sources toggle
#5. When you see the following error message, ignore it as we have already established that Uranus is a safe add-on. Click, ‘Yes’ to proceed.
Now we are all set to install Uranus Addon on Kodi. In fact, you can install any third-party addon you like.
I always recommend my readers to switch this option off once they have installed the desired app. This keeps your device safer.
Part 2 – Add the Source for Uranus Kodi Addon
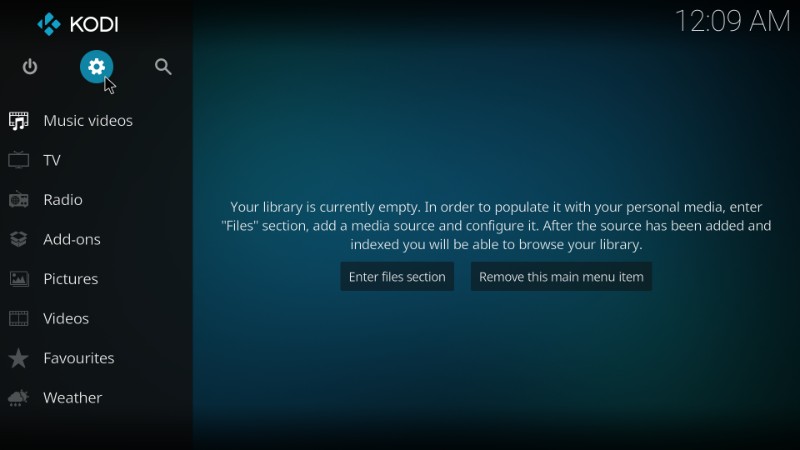
#1. Run Kodi and click ‘Settings’ on the top left of the home screen
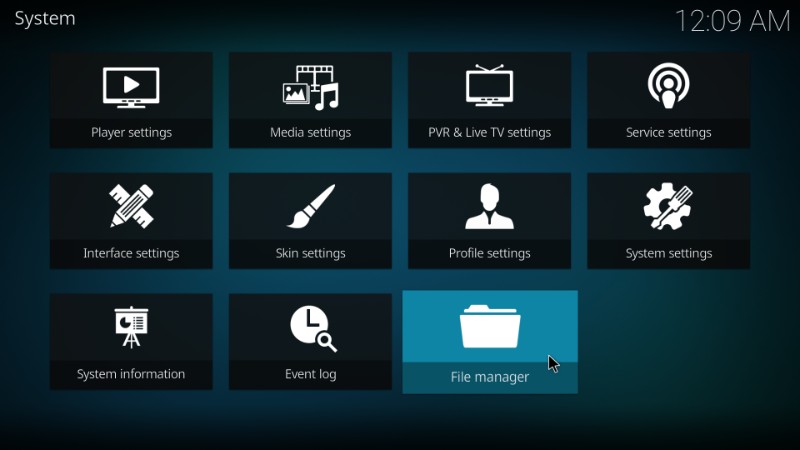
#2. When you see the list of the options, click ‘File Manager’
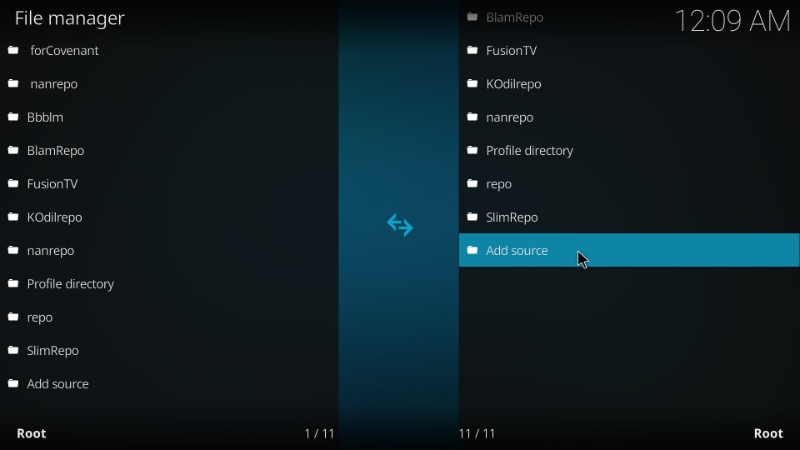
#3. Now you will see ‘Add source’ as one of the options on the next list. Open it!
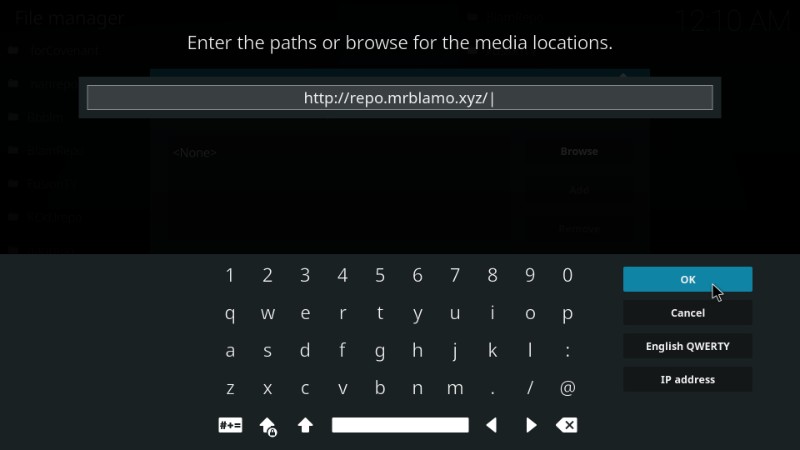
#4. On the following window, click ‘’ and enter repo.mrblamo.xyz/ . Type the URL exactly as I have provided. This is the new URL and is guaranteed to work for the most part. In the event it doesn’t, you can use the old, alternative link blamo.teverz.com/.
Hit ‘OK’ once done
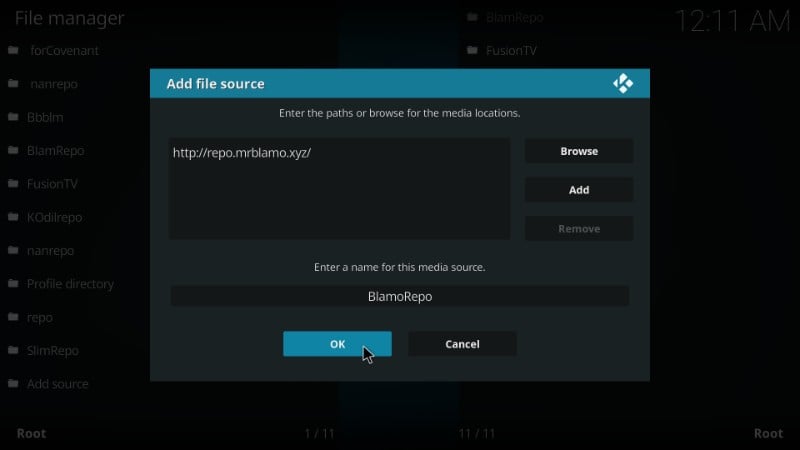
#5. You also need to provide a name for this repo/source in the ‘Enter a name for this media source.’ You may enter any name of your choice. Make it relevant though, so that you may identify it later. For this article, I give it the name ‘BlamoRepo’.

#6. Click the ‘OK’ button once done.
You have now added the new repository source from which we will install Uranus Kodi addon.
Part 2 – Install Uranus on Kodi Using the Added SourceÂ
Now that the source is added, we will fetch Uranus addon from it. This part is easy. Here are the steps.
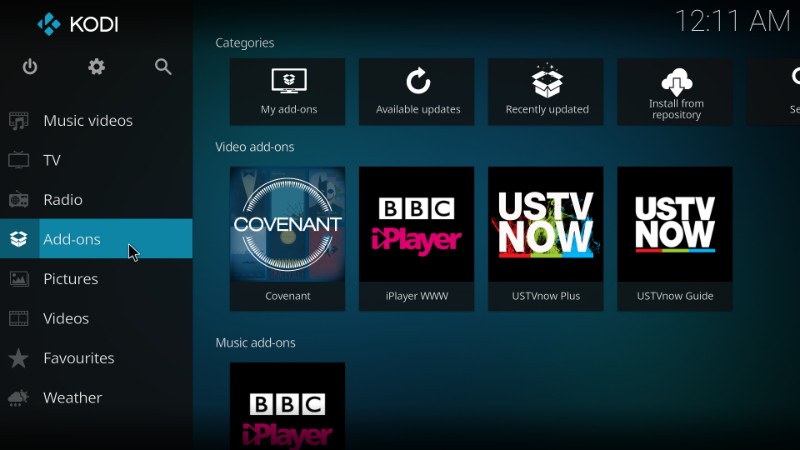
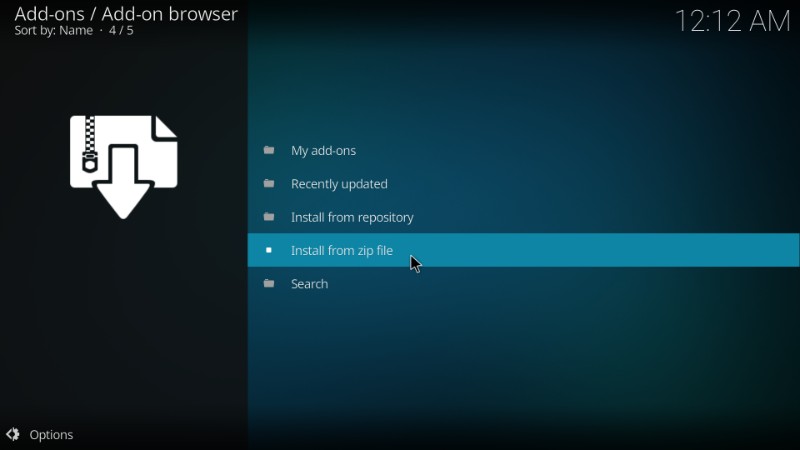
#1. Press the Backspace or Escape key until you are back on the Kodi home screen. From here, select ‘Add-ons’ from the menu on the left.
#2. On the next screen, click on the icon on the top left that looks like an open box (doesn’t it also look like the Dropbox icon?). This option is popularly called Package Installer.
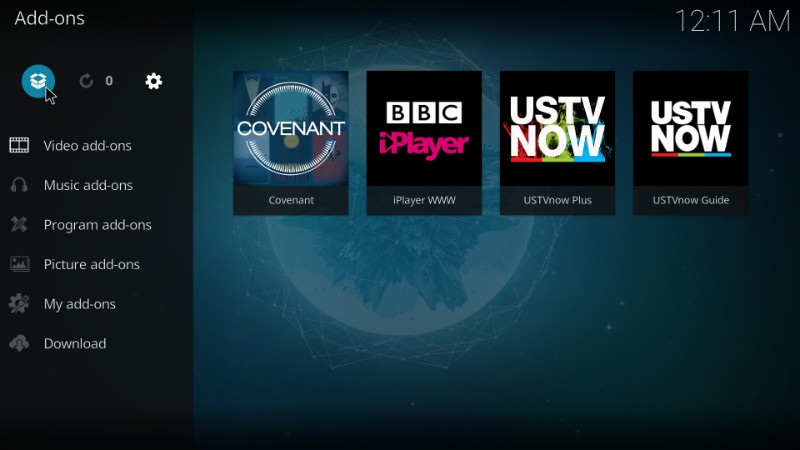
#3. Click on ‘Install from zip file’
#4. On the next window you should be able to see ‘BlamoRepo’, the name we chose for this source (in case you chose any other name, select it instead)

#5. Now, you should see a list of a bunch of .zip files. Click on the file that reads something like ‘repository.griffin-x.x.x.zip’.  The ‘x’ here replace the actual version number of the repo. At the time of writing this article, repository.griffin-0.0.6 was the version.
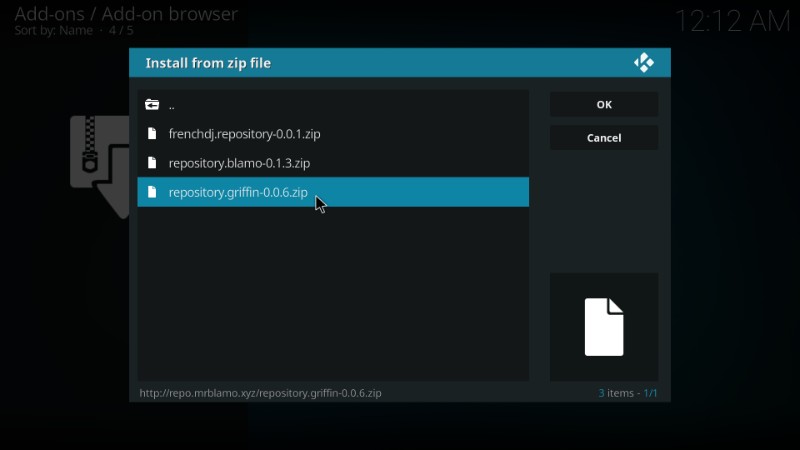
#6. Now, wait for the add-on installed notification to appear on the top right of the screen. It may take from a few seconds to a minute, depending upon the size of the repository
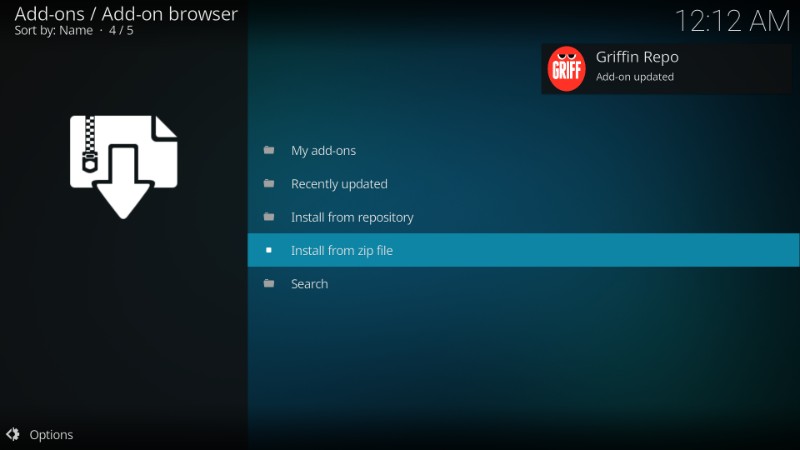
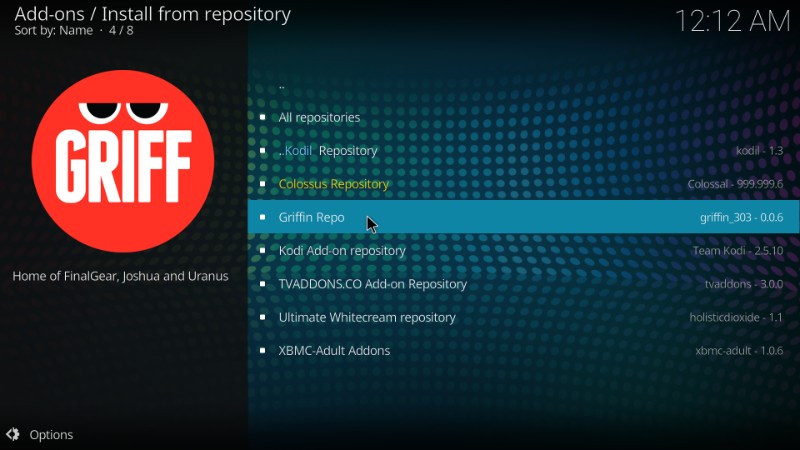
#7. Now that the repository has been added, we can install Uranus on Kodi from it. Click on ‘Install from repository’ option

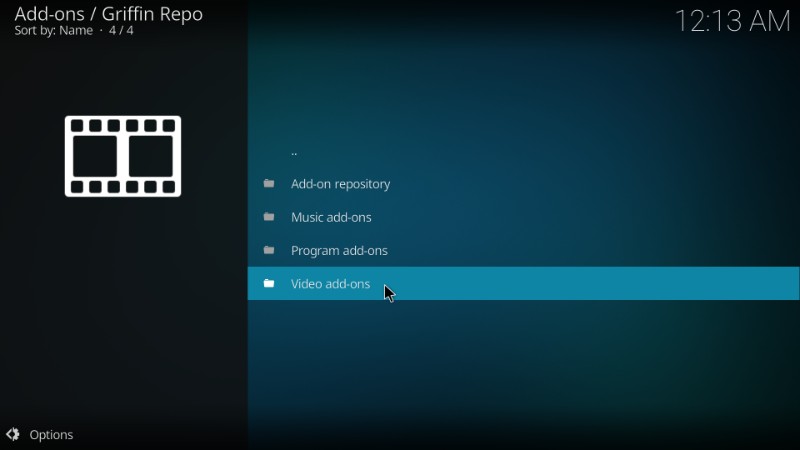
#8. Select ‘Griffin Repo’
#9. Now click on the ‘Video add-ons’ option
#10. You will see Uranus option right there. Click it!
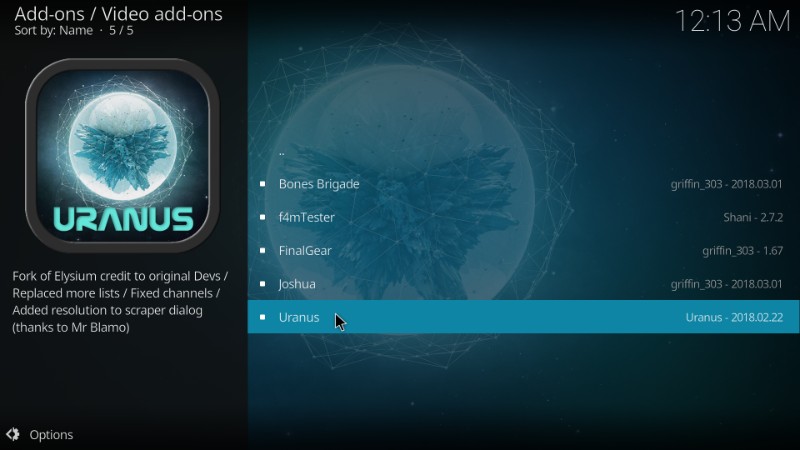
#11. Now click on the button ‘Install’ on the bottom

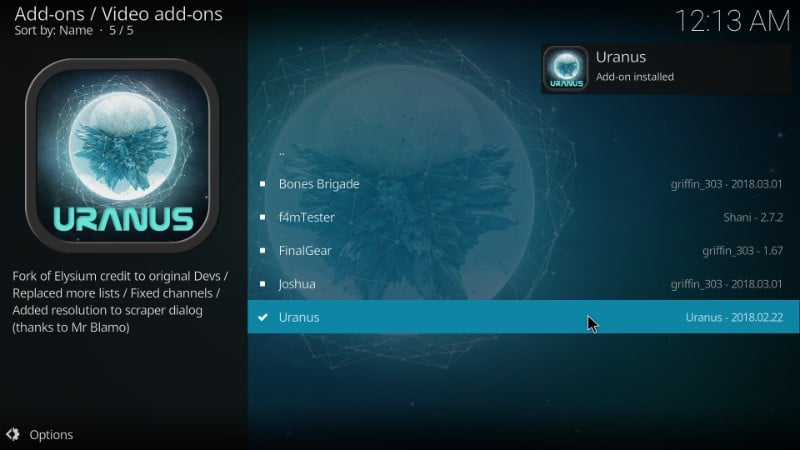
#12. And now, the only thing left for you to do is wait for the ‘Add-on installed’ notification to appear again.
Well, that’s how you add Uranus addon on Kodi 17.6 version. Go back to the Kodi home screen. If you don’t have a lot of add-ons, you should be able to see Uranus on Kodi home screen. And, if you happen to have many, just navigate to Add-ons > Video Add-ons. You will find Uranus here.
Kodi users should always use a VPN to protect their online identity and privacy while streaming. I always use ExpressVPN on all streaming devices and I suggest you do the same.
You can get 49% Off on ExpressVPN’s annual plan. It comes with a 30-day money-back guarantee.
Click HERE to Get ExpressVPN
This exclusive discount is for a limited time only.
Steps to Install Uranus on Kodi Jarvis
As I promised, here is a quick look at how you can install Uranus add-on on Kodi Jarvis:
- From Kodi home screen, navigate to System/Settings > File Manager
- Open ‘Add-source’
- Click and enter the following path: repo.mrblamo.xyz (exactly as it appears here). If this URL does not work, try blamo.teverz.com/
- Click ‘OK’
- Now enter a name for this source in the ‘Enter a name for media source’. Like before, choose a relevant, identifiable name. I choose BlamoRepo again. Click ‘OK’
- Go back to the home screen and select System/Settings again
- Open ‘Add-ons’ option
- Click on ‘Install from zip file’ followed by BlamoRepo (the name you chose in step 5)
- Click repository.griffin-x.x.x.zip
- Wait for a few seconds for the ‘Addon installed’ notification to appear
- Now select ‘Install from repository’
- Open Griffin repo
- Go to Video Add-ons and from here select ‘Uranus’
- Click ‘Install’ on the bottom
- Again, wait for the ‘Add-on installed’ notification
When you see the notification, return to the home screen and open Videos. From here, open ‘Video add-ons’ section and you will see the Uranus add-on icon.
Explore Uranus Kodi Addon
Run Uranus and you will see a long list of categories including Movies, TV Shows, Spotlight, TV Collections and many more. Each category is further divided into subcategories. For instance, when you open Movies, you see the options In Progress, Featured, Popular, New Movies, etc.
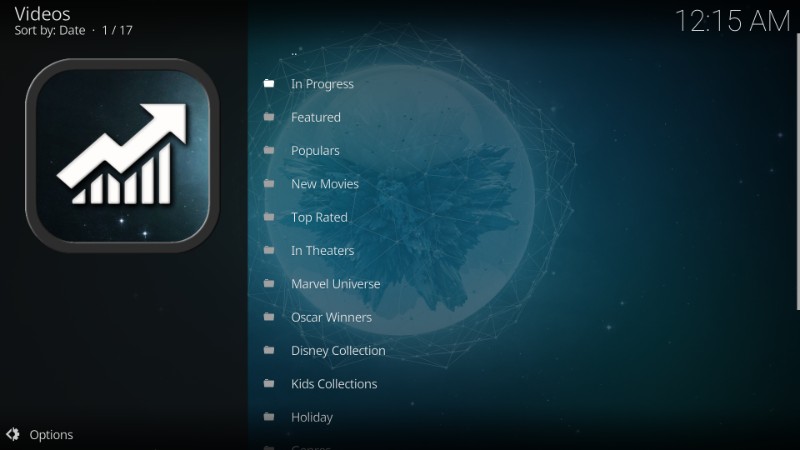
Select an option and you should be able to see the list of the available content.
Uranus has a solid collection of content. It may not be as huge as the more popular Covenant, but it is a work-in-progress. I am confident that more will be added to it soon.
You will find multiple stream sources for each title. Again, you will not find as many sources as you would on Covenant. But, the good thing about Uranus Kodi addon is that even though it offers a handful of streaming links, they are all from quality sources and have greater chances of working. After all, all you need is just one good source that can play a title smoothly and uninterrupted.
You will also find plenty of HD links.  In fact, for most titles majority of streams are in HD. That’s not the case with Covenant or Exodus.

Conclusion
There isn’t a lot left to say about Uranus Kodi addon. Of course, I would love to reiterate that it is probably the best addon at the moment as far as providing quality sources is concerned. I was nothing less than impressed when I started streaming from the links it provided. Not only does it aggregate Full HD, 1080 links, most of them work, most of the time. This is more than I can say for any other video add-on, even the more mainstream ones, like Covenant. Uranus addon for Kodi is not about offering dozens of streams, it is about providing the ones that really work. If you are looking for an incredible entertainment experience, go ahead and get Uranus on your Kodi app.
Related:
Disclaimer –Â FireStickTricks.com do not host or link to copyright-protected streams. We highly discourage piracy and strictly advise our readers to avoid it at all costs. Any mention of free streaming on our site is purely meant for copyright-free content that is available in the Public domain. Read our full disclaimer.
(function(d, s, id)
var js, fjs = d.getElementsByTagName(s)[0];
if (d.getElementById(id)) return;
js = d.createElement(s); js.id = id;
js.src = “http://connect.facebook.net/en_US/sdk.js#xfbml=1&version=v2.6”;
fjs.parentNode.insertBefore(js, fjs);
(document, ‘script', ‘facebook-jssdk'));
